
Guide
Getting the most out of Laser Quote
A walkthrough for your first quote, plus a full reference for every field — whether you're on the free calculator or a paid plan.
Getting Started
Welcome to Laser Quote
Laser Quote never asks for a design file. You enter the same numbers you'd already know from running a job once — cut time, material cost, a few machine details — and it works out an accurate price, the same way every time.
The calculator itself needs no account and no email address — it runs entirely in your browser, free forever. Signing up for Plus or Premium adds cloud sync, customer records, and sending branded quotes by email, but you can try the real pricing math right now with nothing to set up.
It works on a phone or tablet just as well as a desktop, so it's usable at the workbench, mid-job.
Set your Global Rates
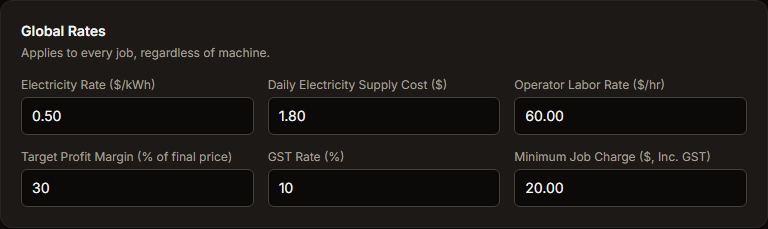
Global Rates apply across every quote, regardless of which machine runs the job. They're worth getting right once, up front — everything else builds on top of them:
- Electricity Rate ($/kWh) — what you actually pay per kilowatt-hour.
- Daily Electricity Supply Cost ($) — the fixed daily connection/supply charge on your power bill, independent of usage.
- Operator Labor Rate ($/hr) — what an hour of your (or an employee's) time running the machine is worth.
- Target Profit Margin (% of final price) — applied once across the whole quote's raw cost; e.g. 30 means profit is 30% of what the job sells for (before GST), not 30% added on top of cost.
- GST Rate (%) — your local sales tax rate, added on top of the subtotal.
- Minimum Job Charge ($, Inc. GST) — see the dedicated topic below; the floor price no quote goes under.
Every number here has a sensible default pre-filled so the calculator is usable immediately — but they're rough starting values, not your actual numbers. Update them to match your real business before relying on a quote.
Add your first Machine Profile
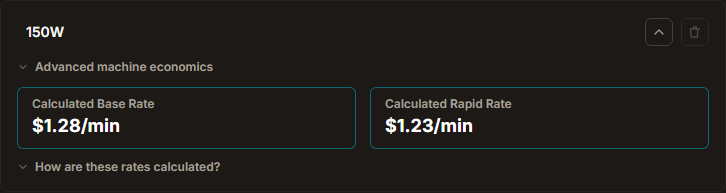
A Machine Profile represents one physical laser. Pick the closest wattage preset to prefill reasonable starting numbers, or start from a blank custom profile — every field is editable afterwards either way.
Each profile shows a Calculated Base Rate and Calculated Rapid Rate ($/min) — that's the number actually driving your quotes, worked out from the fields behind the "Advanced machine economics" toggle (tube replacement cost, tube life, power draw, and overhead). Those fields are collapsed by default since they're easy to skip past on a first look — expand them any time to see or adjust exactly what's behind the rate.
Free is capped to one Machine Profile and one quote layer. Plus and Premium remove both caps.
Build your first Quote
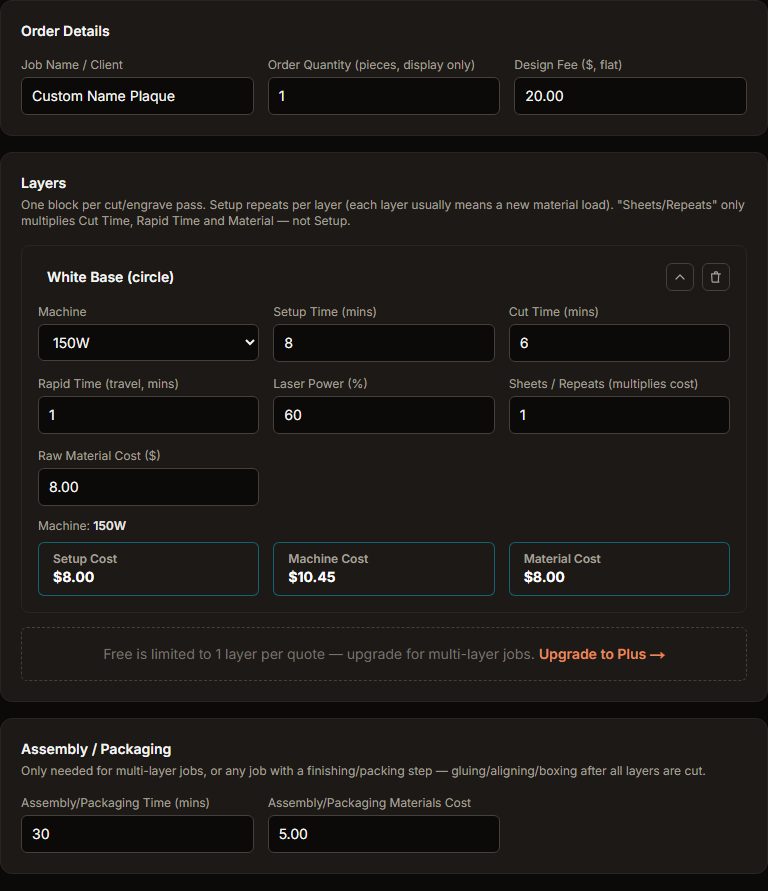
A quote is built from one or more Layers — one block per cut/engrave pass. Multi-material jobs get one layer per material.
The one distinction worth getting right early: Order Quantity (how many finished pieces this job produces) is separate from a layer's Sheets/Repeats (how many separate sheets or machine runs that one layer needs). See the dedicated topic below — mixing these up is the single easiest way to get a wrong price.
Assembly / Packaging is optional — only fill it in for multi-layer jobs or anything with a finishing step (gluing, aligning, boxing) after the layers are cut.
Add a Customer
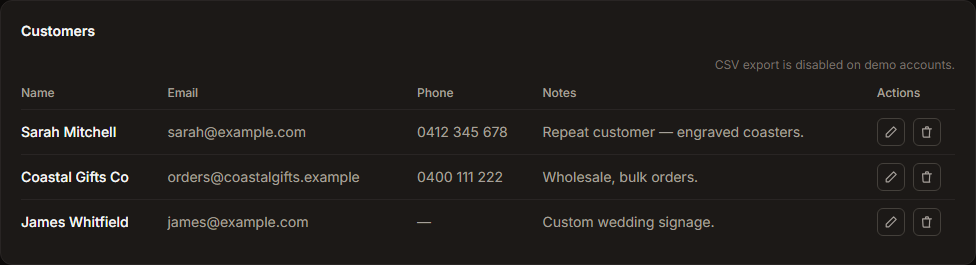
Customer records are simple by design — name, email, phone, and free-text notes. Attaching a customer to a quote lets you send it by branded email and lets your customer view (Plus) or accept/decline (Premium) it via a link, with no login required on their end. You can also add a customer without leaving the quote you're building — use + New next to the customer dropdown and everything you've entered so far stays put.
Send a Quote

Once a quote has a customer attached, Send Quote emails them a branded copy (your logo and color) and marks the quote as Sent. The email includes a link to a public page — no login needed for your customer to view it.
On Plus, that link is view-only: job name and price, nothing else. On Premium, it's interactive — Accept/Decline buttons, plus live tracking of the moment your customer actually opens it.
Understand Quote Statuses
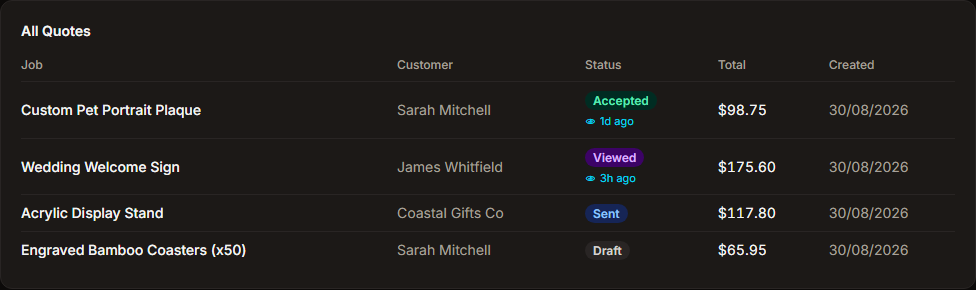
- Draft — being built, nothing sent yet.
- Sent — emailed to the customer.
- Viewed — Premium only; the customer has opened the link at least once.
- Accepted / Declined — Premium only; the customer responded via the link. A declined quote shows the customer's reason, if they gave one.
- Expired — the quote's valid-until date has passed with no response; the accept/decline link stops working.
Free vs. Plus vs. Premium
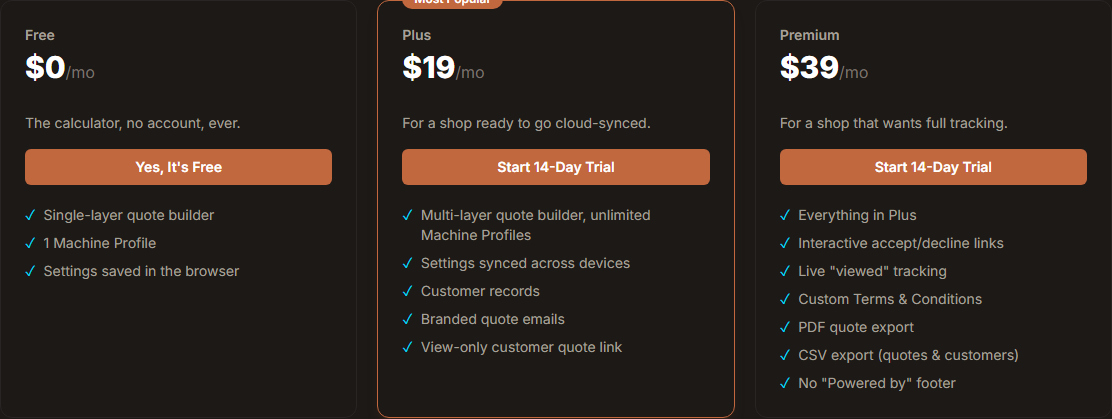
Free — the calculator itself, no account, no signup, ever. Capped at 1 Machine Profile and 1 layer per quote.
Plus — cloud-synced Settings and unlimited Machine Profiles, multi-layer quotes, customer records, branded quote emails, and a view-only customer link.
Premium — everything in Plus, plus an interactive accept/decline link with live "viewed" tracking, custom Terms & Conditions your customer must acknowledge before accepting, PDF and CSV export, and no "Powered by Laser Quote" footer.
Every trial is 14 days, no card required. If you don't subscribe afterwards, your data stays — paid features just pause until you pick a plan.
Full Reference
Global Rates, field by field
- Electricity Rate ($/kWh) — combines with a machine's Power Draw to work out the electricity cost of a job's run time.
- Daily Electricity Supply Cost ($) — your power bill's fixed daily charge, spread across the hours you actually run machines.
- Operator Labor Rate ($/hr) — applied to Setup Time on every layer (see Quote Builder reference below).
- Target Profit Margin (% of final price) — applied once across every cost line (Setup Labor, Machine, Material, Design Fee, Assembly Labor, Packaging), before GST is added; e.g. 30 means profit is 30% of the Subtotal, on every job, regardless of its cost mix.
- GST Rate (%) — added on top of the subtotal to produce the Final Quote.
- Minimum Job Charge ($, Inc. GST) — see the dedicated Minimum Job Charge topic.
Advanced machine economics
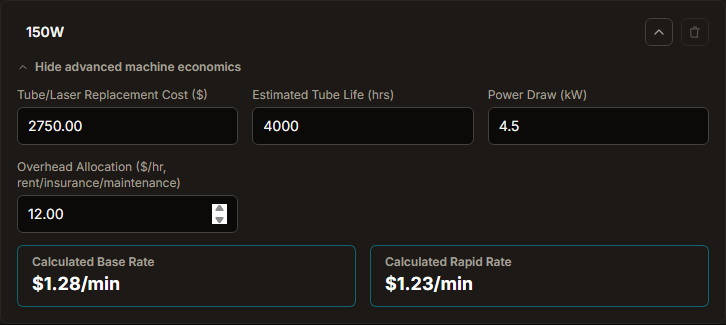
- Tube/Laser Replacement Cost ($) — what it costs to replace the tube/laser source when it wears out.
- Estimated Tube Life (hrs) — how many running hours you expect from it before replacement. Cost ÷ life gives a per-hour wear cost, folded into the machine rate.
- Power Draw (kW) — the machine's electricity draw while actually cutting, combined with your Electricity Rate.
- Overhead Allocation ($/hr, rent/insurance/maintenance) — the portion of fixed business costs (rent, insurance, maintenance) you allocate per hour to this specific machine. Not electricity, not tube wear — the general cost of keeping this machine running and available.
- Want to see how these combine into the per-minute rates? Open How are these rates calculated? under the rate boxes — see "Where your machine rate comes from".
Machine Profiles reference
Add one profile per laser you own, any wattage — pick a preset or start custom. Rename a profile any time by editing its name directly. At least one profile is always required, so Remove is disabled once you're down to your last one.
On Plus and Premium, use the stacked up/down arrows to reorder your list — the order you set shows everywhere a profile is picked, including the Machine dropdown on each quote layer. (Free is capped to one profile, so reordering doesn't apply there.)
Customers reference
Name and Email are required; Phone and Notes are optional. Edit or delete a customer any time from the Customers list — you'll be asked to confirm a delete, and deleting a customer never deletes the quotes attached to them, it just clears the link. Premium can export the (filtered) customer list as CSV.
- Search and sort — search by name, email or phone as you type, and sort by newest or name (A–Z / Z–A).
- Customer page — click a customer's name to open their page, with a Quotes tab and a Material & Finishes tab (see "Customer finishes and re-ordering"). Each quote row has a Re-order Job button.
- Quotes per customer — the Quotes column shows how many quotes a customer has. Click it to expand the list: each job (click to open it), its total and date.
- Premium: who actually pays you — the expanded list also shows each quote's status, and the column adds the total value of accepted quotes and what's still pending (sent or viewed, not expired). Sort by Top revenue (accepted) to see your best customers first.
"Accepted" is the value of quotes the customer accepted — not payments received. Accepting is a Premium feature, so statuses and revenue figures only appear on Premium.
Quote Builder fields
Order Details — Job Name/Client (your own reference), Order Quantity (see the dedicated topic below), Design Fee (a flat one-off charge, e.g. for artwork setup).
Layers — one block per cut/engrave pass. Each layer has: Machine (which profile runs it), Setup Time, Cut Time, Rapid Time (travel moves, not cutting), Laser Power %, Sheets/Repeats (see below), and Raw Material Cost — a genuine raw cost, with no markup of its own; your Target Profit Margin (Global Rates) is the only profit lever, applied once across the whole quote. Use the copy icon on a layer to duplicate it (named "… (copy)") instead of re-entering similar numbers; on the Free calculator, which is limited to one layer, it prompts you to upgrade.
Under the fields, Material billing switches a layer between Nested Area and Bill Full Sheet (Dedicated Stock) — see "Full-sheet costing and offcuts". When the quote has a customer, a Saved customer finishes menu lets you recall their materials, and + Save Finish to Customer stores the layer's material for next time.
Assembly / Packaging — time that isn't laser time, charged at your labour rate, plus an optional flat Materials Cost. Use it for finishing after all layers are cut (gluing, aligning, boxing) and for the hands-on time that's easy to leave out of a quote: customer messages, file clean-up and masking. It's one time figure for the whole order.
Your Price (optional) — Plus and Premium only. Type a price to charge instead of the calculated one; see "Charging your own price".
Order Quantity vs. Sheets/Repeats
This is the single distinction most worth getting right — they look similar but do very different things.
- Order Quantity (at the quote level) is how many individual finished pieces this job produces — e.g. 10 tags nested and cut together on one sheet. It's display only: it never multiplies into the price. It exists purely to show you a "≈ $X.XX per unit" reference line.
- Sheets/Repeats (per layer) is for when one layer's design needs multiple separate sheets or machine runs to fulfil the order — too large to fit on one sheet. It multiplies Machine Cost and Material Cost, but not Setup Cost — you don't re-set-up the machine for each repeat of the same design.
Cut Time, Rapid Time, and Raw Material Cost, as entered, already represent one whole sheet as run (however many identical pieces are nested on it) — never multiply those by Order Quantity yourself.
What is GST on my quote?
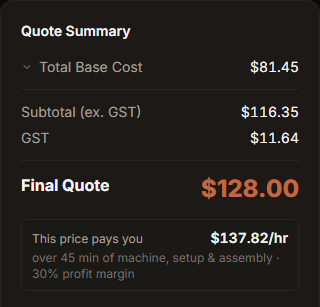
The GST line on a Quote Summary is your Global Rates "GST Rate (%)" applied to the Subtotal (ex. GST) — your Total Base Cost with your Target Profit Margin applied, before tax. Subtotal + GST = Final Quote. Change the rate once in Settings and it applies to every quote from then on.
Currency and tax label
In Settings, the Currency & Tax card sets your currency (AUD, USD, GBP, EUR, NZD or CAD) and the label for your tax line (GST, VAT, Sales Tax, or your own). Your tax rate is the "GST Rate (%)" field in Global Rates — it simply follows whatever label you choose.
- The currency symbol and tax label appear in the quote builder, your Quotes list, the customer's quote page, the PDF, and the emails sent to you and your customer.
- Set the tax rate to 0% and the tax line is hidden everywhere.
- Changing currency only changes how amounts are shown — it never converts or changes a price.
- The Free calculator and the free tools stay in $ / GST.
Minimum Job Charge
Set in Global Rates as "Minimum Job Charge ($, Inc. GST)". If a job's calculated price comes out below that floor — a tiny, fast job — the minimum is charged instead, and the Quote Summary shows a note: "Minimum job charge applied — calculated price was $X", so you can always see what the job would have priced at without the floor.
The "per unit" price line
Shown on the Quote Summary as "≈ $X.XX per unit (N pcs)" whenever Order Quantity is greater than 1. It's simply the Final Quote divided by the Order Quantity — a reference figure for you, not a separate calculation. See Order Quantity vs. Sheets/Repeats above for why Order Quantity itself never changes the price.
Full Quote Summary breakdown
- Total Base Cost — collapsed by default; expand it to see the six raw cost lines it's made of, none of which carry any margin of their own:
- Setup Labor Cost — Setup Time × Operator Labor Rate, summed across layers.
- Machine Cost — electricity + tube wear + overhead, across all layers' cut/rapid time.
- Material Cost — Raw Material Cost, summed across layers.
- Design Fee — the flat fee entered on Order Details.
- Assembly Labor / Packaging Materials — from the Assembly/Packaging card.
- Subtotal (ex. GST) — Total Base Cost with your Target Profit Margin applied (Total Base Cost ÷ (1 − margin%)) — so it's higher than Total Base Cost by exactly your margin, not the same number.
- GST — see the dedicated GST topic.
- Final Quote — Subtotal + GST, or the Minimum Job Charge, whichever is higher. If you've typed your own price it reads Your Price, with "Calculated price was $X" underneath.
- This price pays you — what the price earns per hour of work, and your profit margin; see "What 'This price pays you' means".
What "This price pays you" means
Under the Final Quote, a small box reads something like "This price pays you $137.82/hr over 45 min of machine, setup & assembly · 30% profit margin". It answers a question the total alone can't: what am I actually earning for the time this job takes?
It's the price you're charging (before GST), minus the material and packaging costs, divided by the hours on the quote — machine run time (cut and rapid, times any sheets/repeats), setup time and assembly time. What's left pays for your labour, your machine's wear, power and overhead, and your profit.
- Design time isn't included — the Design Fee is a flat amount with no time attached, so only the timed work counts.
- If the Minimum Job Charge kicks in, or you type your own price, the figure reflects the price actually charged.
- It isn't shown when a quote has no timed work at all.
- Time is shown in hours and minutes. The profit margin shown is on the price actually charged, so it can differ from your Target Profit Margin when you've changed the price.
Use it as a sanity check: if the hourly figure feels low for the effort — messages, handling, packing — add that time under Assembly / Packaging, or charge more.
Charging your own price
The calculated price is a floor and a reference, not a verdict. Some jobs are worth more than their cost-plus price; sometimes you'll choose to charge less. In the quote builder, the Your Price (optional) card lets you type the GST-inclusive price you want to charge instead. The calculated price shows as a placeholder, and Use calculated price clears your entry.
- Your price becomes the quote's price everywhere — the summary, the email, the PDF and the customer's quote link. Subtotal and GST are worked back from it using your GST rate.
- Your costs don't change, so the summary shows what the new price does to your profit margin and to "This price pays you".
- A price below the calculated one shows an amber note with your new margin. A price below your total cost shows a red warning with the loss — you can still save it.
- While the quote is a draft you can change or remove your price; once sent, it's fixed like the rest of the quote.
- The Free calculator doesn't have this field — nothing is saved there.
Searching and filtering quotes
On the Quotes page, type in the search box to match job names and customer names as you type, and use the status pills (All, Draft, Sent / Viewed, Accepted, Declined, Expired) to narrow the list. Each pill shows how many quotes it holds for your current search, and Clear filters resets both. Premium's CSV export exports exactly the rows you're looking at.
The Overview and its time period
The dropdown at the top of the Overview sets the time period, based on when each quote was created. It's remembered in the page address, so refreshing keeps your choice. The default is All time.
- Quote Status, Acceptance Rate and Recent Quotes follow the period.
- The Customers total is always everyone — only its "+N" new-customer badge follows the period ("this month" when on All time).
- "This week" starts on Monday.
Duplicating a quote
Use the copy icon on any row in the Quotes list, or Duplicate as new draft on a quote's page. It works on quotes in any status, including sent and accepted ones, and never changes the original.
- The copy is named "… (copy)" and keeps the customer, quantity, design fee, assembly details and every layer, including full-sheet settings and saved-finish links.
- Re-order Job does the same thing, named "… (re-order)" — see "Customer finishes and re-ordering".
- It's re-priced at your current Settings and Machine Profiles, so it can differ from the original if your rates have changed since.
- It starts as a draft with a new quote number. The valid-until date and any price you set yourself are cleared — set them again for the new job.
Where your machine rate comes from
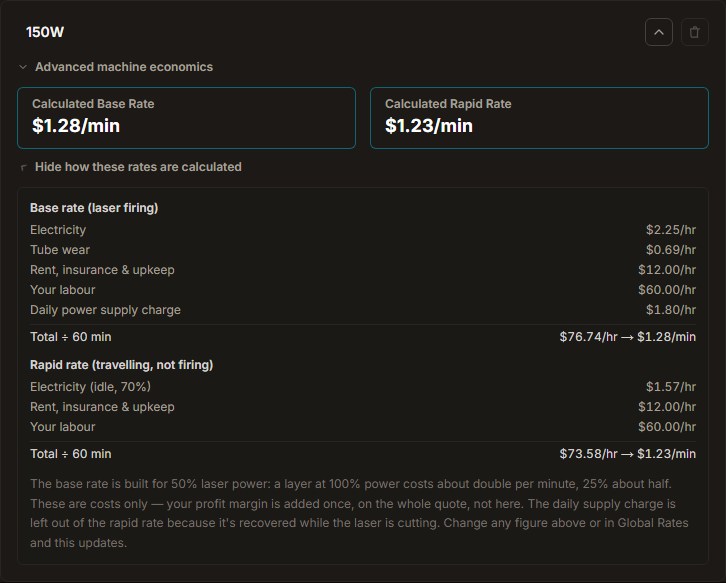
Under each profile's Calculated Base Rate and Calculated Rapid Rate, How are these rates calculated? lists the per-hour pieces behind them and the total ÷ 60 per minute.
- Base rate (laser firing) — electricity (power draw × your electricity rate), tube wear (replacement cost ÷ tube life), rent/insurance/upkeep, your labour, and the daily power supply charge.
- Rapid rate (travelling, not firing) — electricity at 70% of the draw, rent/insurance/upkeep, and your labour.
- The base rate is built for 50% laser power. A layer at 100% power costs about double per minute; at 25%, about half.
- The daily power supply charge is deliberately added to every quote through the base rate, so that fixed cost is never left out. It's not in the rapid rate because it's recovered while the laser is cutting.
- These are costs only. Your Target Profit Margin is added once, on the whole quote — never inside a rate.
Sending & Quote Links
Sending a quote emails the customer a branded copy and marks it Sent. Both plans include a public link — no login needed for the customer.
Plus: view-only — job name and price, nothing else.
Premium: interactive — Accept/Decline buttons, a required Terms & Conditions acknowledgement if you've set one, and live tracking of the first time the customer actually opens the link (shown on your dashboard as "Viewed Xh ago"). A quote past its valid-until date shows as expired and can no longer be responded to.
The customer's page shows the order quantity and a "Valid until" date. If they decline, they're asked why (price too high, lead time too long, found another supplier, project cancelled, or other, plus an optional note) — they can skip it. Their reason is emailed to you and shown on the quote's page in your dashboard.
Custom Terms & Conditions
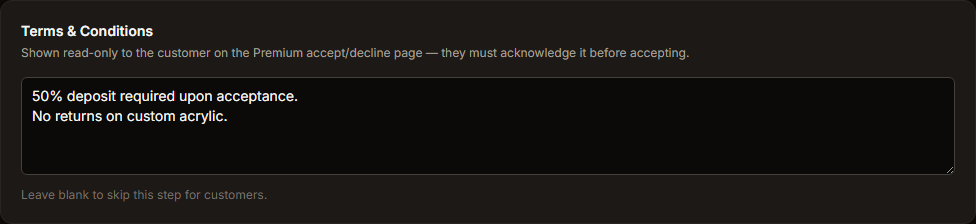
Premium only. Set a free-text policy blurb in Account settings (e.g. deposit requirements, return policy) — it's shown read-only to the customer on the accept/decline page, with a required acknowledgement checkbox before Accept is enabled. A snapshot of the policy is captured at the moment a customer accepts, so editing the policy later never rewrites what a past customer actually agreed to.
Why the Free calculator is capped at 1 layer
Single-material jobs get a full, genuinely usable calculator for free, no strings attached. Multi-layer jobs — more complex, higher-value work — are the upgrade trigger for Plus, which also unlocks unlimited Machine Profiles.
Billing & Plans reference
Every trial is 14 days with no card required. Subscribe or manage your plan any time from the Billing page — billed monthly or annually, cancel any time, no lock-in. If your trial ends without subscribing, or you cancel, your data stays exactly as it was — paid features simply pause until you pick a plan again.
Try Plus and Premium before signing up
The Pricing section on the homepage has live demo accounts for both Plus and Premium — no signup required. Sample data resets every 24 hours and no real emails are ever sent, so it's safe to click around freely.
Account & Branding
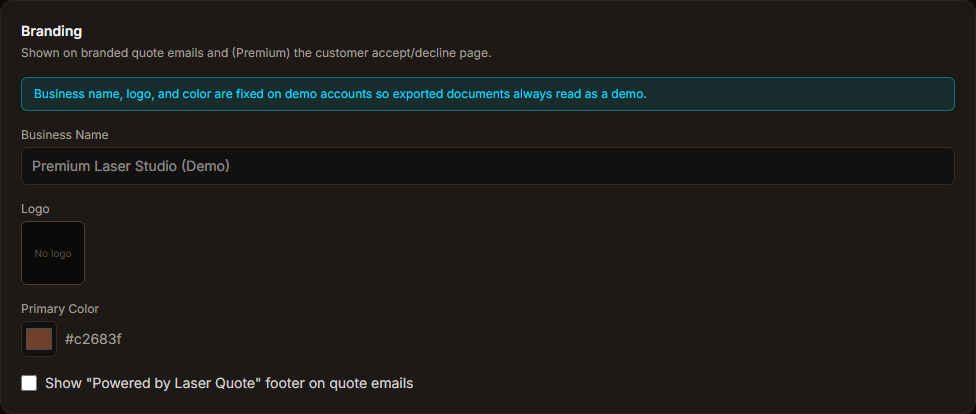
Your business name, logo, and primary color show on branded quote emails and (Premium) the customer accept/decline page. The "Powered by Laser Quote" footer is shown on Plus-plan quote emails by default — Premium can turn it off entirely.
CSV & PDF export
Premium only. PDF export gives a professional, downloadable copy of any quote (draft or sent+). CSV export gives your quotes and customer list in an accounting-ready format, exported directly from the page — no extra setup.
Free tools
The Tools page (in the site header) has standalone calculators — no account, no email:
- Material Cost & Waste Estimator — parts per sheet, cost per part and waste.
- Laser Test Grid Generator — builds a speed and power test card for dialling in a new material. Choose Engrave or Cut, the power and speed ranges, the swatch shape (star, square or circle), card size, a hanger hole and a material line. Download it as an SVG, or as a LightBurn file (.lbrn2) that already has each swatch's speed and power set on its own layer. Notes:
- With the LightBurn Indexed colour scheme every swatch gets its own LightBurn layer, so a grid can have at most 28 swatches (for example 7×4, 6×4 or 5×5). The downloads are switched off until it fits. Monochrome has no limit but can't carry per-swatch settings.
- Switching between Engrave and Cut rescales the speed range by 10× (cutting runs slower), which you can then edit.
- For the LightBurn file, pick the laser origin your machine uses in LightBurn (Edit → Device Settings → Origin). If it doesn't match, the design opens flipped.
- The card outline keeps LightBurn's default cut settings, so set the cut power and speed for your material. The numbers are starting points for your own testing — always test on scrap.
- Custom Shipping Box Generator — cardboard box die-lines with cut and score lines on separate layers. See Shipping Box Generator in this guide.
- Machine ROI / Payback Calculator — weeks to pay off a laser and projected annual profit from machine price, jobs per week, profit per job and weekly consumables. It ignores tax and finance costs, so treat it as a rough guide.
- Laser Tools Directory — a searchable list of third-party generators and software. See Laser Tools Directory in this guide.
Customer finishes and re-ordering
Repeat customers often want the same acrylic colour or board again. Save it once and you never have to look it up.
- Save from a quote: choose a customer on the quote, then on any layer press + Save Finish to Customer. Enter the supplier, colour / finish, thickness and any prep notes. Prep notes is a free-text box, so it suits settings and reminders, for example "Using 100W machine with 50% power / 20 speed. Peel film after engraving."
- Recall: with a customer selected, each layer has a Saved customer finishes menu. Picking one names the layer after the finish and shows the supplier and prep notes.
- Edit: with a finish recalled on a layer, press Edit Finish to correct its supplier, colour, thickness or notes. Editing changes what future recalls show; layers already on quotes keep their own names and numbers.
- Manage: open a customer (click their name on the Customers page) and go to the Material & Finishes tab to add, edit or delete finishes. Deleting a finish never changes past quotes.
- Re-order Job: on a customer's Quotes tab, the customer list, or a sent quote, press Re-order Job. You get a new draft with the same layers and finishes, today's date and the next quote number, priced at your current rates. The original quote is not changed.
Full-sheet costing and offcuts
By default a layer's material is billed as you enter it, usually the cost of the area your parts take up (Nested Area). When you buy a sheet just for one job, switch the layer to Bill Full Sheet (Dedicated Stock).
- Enter the price of the whole sheet as the Raw Material Cost.
- Pick the sheet size (200 × 300, 300 × 600, 600 × 600, 900 × 600, 1200 × 600, 1200 × 900, 1200 × 1200 or 2400 × 1200 mm) or choose Custom and type the width and height in mm.
- Enter the area the job uses, in cm² or mm² (switch with the small toggle above the box). Your nesting software or the Material Cost & Waste Estimator can tell you.
The amber Offcut note shows the share of the sheet left unused and the dollar amount of waste included in the quote. The price itself is the sheet price (times Sheets / Repeats), so the waste is not an extra charge on top; the note shows how much of the price it accounts for.
Used area larger than the sheet is treated as no waste. If the sheet size is blank, no offcut is shown.
Shipping Box Generator
Open Tools → Custom Shipping Box Generator. It runs in your browser, with no account.
- Pick a style: Multi Crease box (taped corners, several wall creases), Roll-end tuck-top (a mailer that locks without tape or glue) or Telescoping (a tray and a loose lid; the corner tabs need glue or tape), Regular slotted box (the classic shipping carton), Full overlap box (long flaps overlap completely) or Open shipping tray. The slotted cartons have a glue flap on one end: glue or tape that seam, then tape the top and bottom flaps.
- Enter the inside size (length, width, height in mm), the space you need for your product.
- Choose the board thickness (1.5, 3 or 4 mm) or type your exact measurement. Walls and slots are sized from it, so measure your board.
- For the wrap style, each wall has a base crease, then the first wall crease at your height and more after it. Set Wall creases (2 to 8) and the score gap between them. The flap beyond the last crease folds over the top (front and back cover the opening, left and right are shorter), and you can fold at whichever crease suits the product.
The preview shows cuts in red and scores in blue, and the size of the flat sheet you need for one box.
Download an SVG, copy the SVG code, or download a LightBurn file (.lbrn2) with scores on layer C01 and cuts on C02. Choose your laser origin first (Edit → Device Settings → Origin in LightBurn) or the design opens flipped.
- Flap and tab corners are square by default. Choose Chamfered under Flap corners to cut the tips off, which can help tucks and tabs slide in.
- The speed and power in the LightBurn file are placeholders. Set them from your own test grid. For the score layer (C01) we suggest Perforation mode with Cut 5 mm and Skip 5 mm; use a full cut for the outline (C02).
- Fold along the flutes where you can, and make a prototype in thin card first.
- Use the flat sheet size in the Material Cost & Waste Estimator to see how many boxes fit on a board.
Laser Tools Directory
Open Tools → Laser tools directory for a searchable list of free and open-source tools for laser cutters, plus our own.
- Search matches the name, description and feature tags as you type.
- Category pills narrow the list: Boxes & Cases, Living Hinges, Text & Stencils, Generators & Art, Control Software, and Costing & Benchmarks.
- The Built by LaserQuote banner links to our own tools. Everything else opens the maker's site in a new tab.
- Each card shows a pricing label (100% Free, Open Source, Freemium). Third-party tools are independent of LaserQuote, so check current pricing and licences on their sites.
Know a tool that should be listed? Use Suggest a tool at the bottom of the page, which opens the contact form. We add tools by hand, so suggestions are reviewed rather than published automatically.
Is my data safe if I never make an account?
On the Free plan, Settings and Machine Profiles are stored in your browser's own local storage only — nothing touches a server until you choose to sign up for Plus or Premium. Nobody but you can see your free-calculator data, and it never leaves your device.
Using Laser Quote on your phone
Both the Free calculator and the full Plus/Premium dashboard work on a phone or tablet — genuinely usable standing at the workbench mid-job, not just a cut-down mobile view.